How to use Crop tools in Photoshop
Did you ever think of not using the Photoshop crop tool while editing photos? Probably not. This is the only tool we cannot ignore. Every photo editor uses this tool at least once every time they use Photoshop. But the question is how efficiently we use this tool. There are many secrets of the crop tool in Photoshop. There are also many features and presets that we don’t know yet. Knowing all the features of the Photoshop crop tool will make our photo editing a lot easier. So, today in this Photoshop tutorial, I’m going to show you the most efficient secrets that will increase your workflow in Photoshop. Let’s get into it.
Rotating and Making the Photo Straight
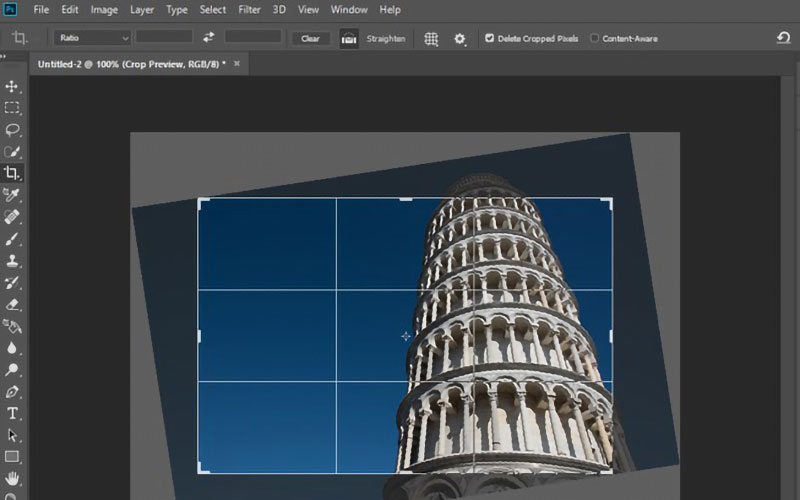
When using Photoshop to edit your photos, you might need to rotate or straighten a specific part of the photo. Because no one wants to upload photos that look unusual or unprofessional. It is a very important task in post-processing. Most of the clients require this service for their product or other photos. Images that are not straight or a little curved need rotating. So, the rotational crop tool helps make your photos straight. How to rotate cropped parts of the photo? Here is what you need to do.
First, open the image in Photoshop which you need to fix. Then select the crop tool from the toolbar of Photoshop. Now move the cursor to the outer side of the image. You will see a two-headed arrow. Yes, this is the symbol or icon for the rotation feature. All you have to do is drag your cursor in any direction you want. It will allow you to rotate your cropped parts of the photo.
When you need to straighten the wonky area of the photo quickly, this is the technique you want to use. When rotating it will also show you gridlines of squares which will help you to rotate the image more accurately.

Perspective Crop Tool
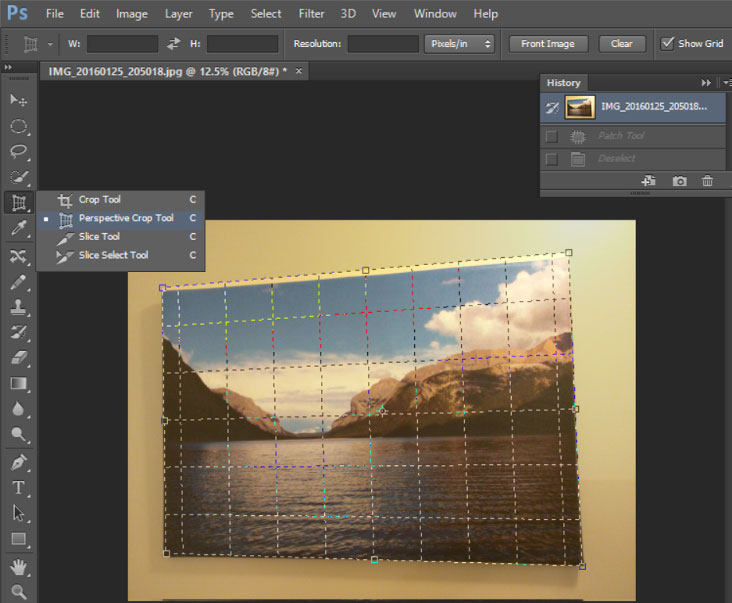
You can fix your distorted image by perspective cropping. Sometimes photos appear unusual and distorted from the photo session. Then photographers need to fix the problem in the photo. Using perspective cropping anyone can make their photo perfect. It also increases the workflow when editing in Photoshop.
To use perspective cropping, first select the crop tool. Then right-click on it and choose “Perspective Crop Tool”. Now select an area of the photo by dragging the cursor. Drag the area which you want to crop. After selecting the area now control the size by pulling the handles in the corner. You can use the Shift key to keep the size proportional. Pull until you are satisfied with the double-click now your image will be distorted. Now you can also make your image fit a rectangle with perspective cropping.

Applying Crop Presets
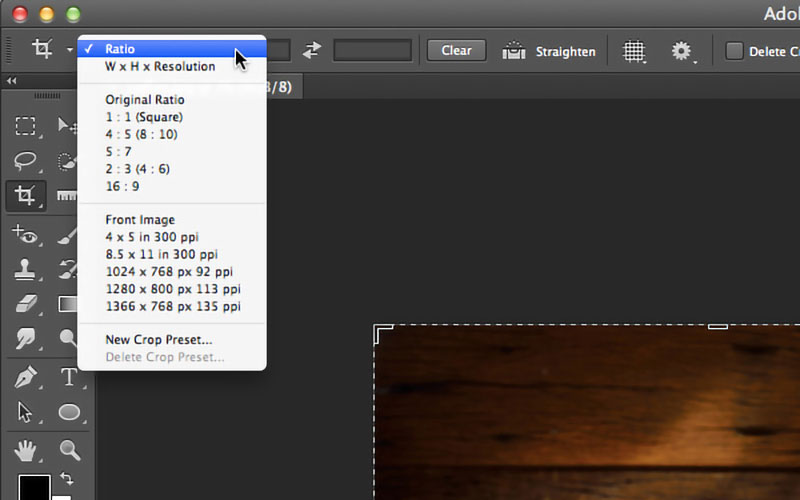
If you want to crop all your photos in the same size then this is the most beneficial feature that Photoshop offers. Photoshop also has a pre-collection of crop presets. You can apply crop presets and create your custom presets at the same time. For cropping various images to the same dimensions this is a great tool. Select from a variety of presets by clicking the drop-down menu in the top toolbar beside the crop symbol. Now choose a preset and drag on the image to create the crop selection.
If you want to make your own crop preset then set the width, height, and resolution in the options bar. Then just click the fly-out menu. Now give a name to the preset. After making it, you will see it on the presets list. Now you can use it for future use.

Delete Cropped Area
After cropping, sometimes you might want to delete your cropped area. Suppose, you have already cropped an area then realized you don’t actually need the whole area. Before making further edits, you can delete or hide extra parts from the cropped area.
To do this, choose to ‘hide the cropped area’ option from the top bar of Photoshop. This way you can pull the cropping tool to bring back the cropped parts. In the latest version of Photoshop, you may see this feature as ‘delete cropped pixels.

Applying Compositional Aids
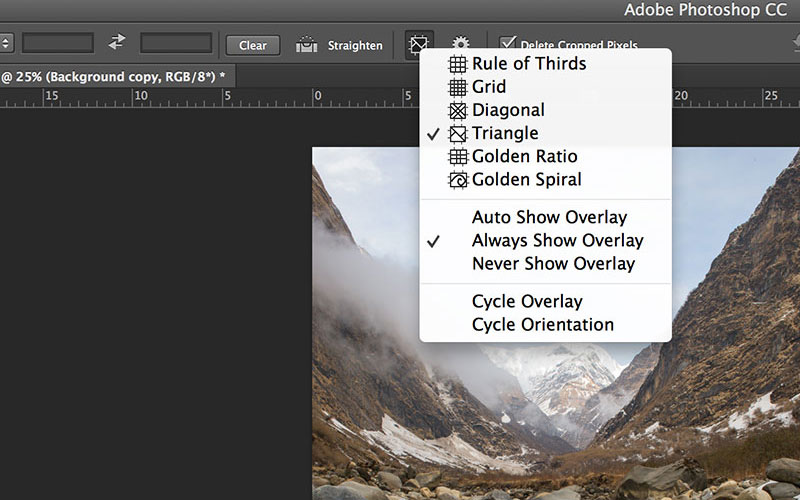
By applying compositional aids, you can use different photography rules for the photo. It allows you to apply the rule of thirds to make your photo more attractive.
From the top toolbar of Photoshop, select overlay options from the drop-down menu. See the below image to identify this feature. Here you will find a variety of overlays. You can use any of them while cropping photos in Photoshop. Choosing this option will help you make triangular composition, golden spiral, and many more.

Crop to the Same Size
There is a great tool in Photoshop if you want to crop a couple of images to the same size. Here is what you need to do.
First, select the crop tool then make the layer active for the image you want to crop. Now choose the option ‘Front Image’ from tool options. It will allow you to configure the crop tool’s dimensions.
At this point drag a crop rectangle on the image. Now, double-click to finish the process. You will see that the cropped image will appear in the same size and resolution as the original one. Sometimes the image may seem bigger than the original image but the actual dimensions are the same.
Conclusion
Photographers use these cropping options most. But there are other options for cropping an image in Photoshop. Hope we will discuss those in future posts. If you have any confusion with cropping in Photoshop then don’t hesitate to share your problem with us.
To activate the crop tool in Photoshop just press the shortcut ‘C’. In windows, press Enter, and in Mac, press Return or just double click inside the crop border to make the crop.


0 Comments